Sunday, 8 February 2015
Uppercase and Lowercase Conversion - Bash Style
$ x="samar"

$ echo "${x^}"
Samar

$ echo "${x^^}"
SAMAR

$ y="${x^^}"

$ echo $y
SAMAR

$ echo "${y,}"
sAMAR

$ echo "${y,,}"
samar
I hope this helps ;)
Read more...
Bookmark this post:blogger tutorials
Social Bookmarking Blogger Widget |
Monday, 18 November 2013
Install HTTrack On CentOS
$ wget http://download.httrack.com/cserv.php3?File=httrack.tar.gz -O httrack.tar.gz
$ tar xvfz httrack.tar.gz
$ cd httrack-3.47.27
$ ./configure
$ make && sudo make install
This should do all. If you wish not to install zlib compression support, you can skip the first step and run the configure as ./configure --without-zlib. I hope this helps :)
Read more...
Bookmark this post:blogger tutorials
Social Bookmarking Blogger Widget |
Sunday, 10 November 2013
JPEG To PDF With Imagemagick
First make sure imagemagick suite is installed in your system.
Ubuntu/Debian
CentOS/Fedora
Below are some of the examples of using convert which is a part of ImageMagick to convert Jpeg to PDF.
Single Image
Multiple Images
Resize and Convert
Negate and Convert
You can actually use different available switches to get your output as expected. I usually use PdfTk in conjunction with this technique to work in different scenarios and it really works great. I hope this helps :)
Read more...
Bookmark this post:blogger tutorials
Social Bookmarking Blogger Widget |
Friday, 18 October 2013
Pattern Based Database GRANT In MySQL
We let different teams work on replicas of same database and hence append the terms such as _dev and _qa as the database prefix. And, we define GRANTS based on these patterns. An example would be something like below:
GRANT ALL ON `%\_dev`.* TO 'user'@'%' IDENTIFIED BY 'password' WITH GRANT OPTION;
I hope this proves useful for some of you guys :)
Read more...
Bookmark this post:blogger tutorials
Social Bookmarking Blogger Widget |
Thursday, 17 October 2013
How I am Trying To Keep My Eyes Safe On Computer
The problem with computer addicts is not getting their eyes off the computer for much longer period and though I've been trying to remember to keep my eyes off the computer in regular interval, I usually never implement this.
My two principles based on my readings on different websites are:
- 20-20-20: In the 20 minutes interval, keep your eyes away for 20 seconds (& view other objects which are around 20 feet away)
- 2 hrs rule: In the 2 hours interval, stay away from computers for at least 2 minutes.
But, you can not really follow the rules so easily and I had to find some other alternative to do so. This is how I am doing it now.
Create two cron jobs for each of the above mentioned methods such that notify-send is triggered in each 20 minutes and each 2 hours informing you to keep yourself safe from computers. So my /etc/crontab looked like this:
*/20 * * * * techgaun export DISPLAY=:0.0 && /usr/bin/notify-send -i /home/techgaun/Samar/scripts/eye_inv.ico "20 - 20 - 20" "Time to take rest. Keep your eye safe :)"
01 */2 * * * techgaun export DISPLAY=:0.0 && /usr/bin/notify-send -i /home/techgaun/Samar/scripts/eye_inv.ico "2 hrs eye rest" "Time to take rest for 2 minutes. Keep your eye safe :)"
You need to replace techgaun with your username and need to give correct path to the ico file if you like to use icon like me. Otherwise, you could just omit the icon in notify-send command. I hope this proves useful for some of you :)
Read more...
Bookmark this post:blogger tutorials
Social Bookmarking Blogger Widget |
Monday, 16 September 2013
Two Ways To Print Lines From File Reversely
Imagine a file somefile.txt with content something like this:
b
c
d
e
Method 1:
e
d
c
b
a
Method 2:
e
d
c
b
a
You can achieve the same effect through other techniques as well but I'll stick to these simple ones :)
Read more...
Bookmark this post:blogger tutorials
Social Bookmarking Blogger Widget |
Friday, 28 June 2013
Rename MySQL root User [How To]
Login to the MySQL console and then type the following SQL statements:
mysql> update user set user="some_other_user" where user="root";
mysql> flush privileges;
It is often good idea to drop anonymous users and the test database because of security reasons. I bet you are never going to use that test database so why keep it? Run the SQL statements as below to do so:
mysql> drop database test;
Also, make sure you use strong passwords. You can use mysqladmin to change passwords.
The later two commands are to ensure that no log of any of your MySQL queries or admin level commands have been stored in the history.
I hope this helps :)
Read more...
Bookmark this post:blogger tutorials
Social Bookmarking Blogger Widget |
Wednesday, 19 June 2013
Customizing Jenkins Layout
The later one does allow to add markups to the page but didn't best fit for our scenario. So we decided to use the Simple Theme Plugin. Installing the plugin is straightforward in jenkins. Once the Simple Theme Plugin is installed, a new content box will appear in your Manage Jenkins -> Configure System which will look something like below:
This plugin requires you to specify your own custom .css and .js file. The good thing about jenkins is you can place your own content at the JENKINS_INSTALL_DIR/userContent/ directory and then access it via http://yourbuildserver.tld/jenkins_path/userConent/yourfile.ext. I was working on the windows system where my jenkins install was at C:\.jenkins\ and hence I placed my CSS and image files inside the userContent directory of jenkins install folder. This should not be very difficult on any other systems if you are familiar with jenkins and your OS.
You can grab the jenkins css files from the webapp root directory (I was using tomcat so I grabbed it from inside there) and then edit the css as per your necessity. In my case, I had to change the header style only so my CSS looked something like below:
#top-panel {
  background-size:100% 100%;
  height: 43px;
  }

#top-panel td#login-field span a {
    background: none; }

#top-panel a {
    background: url("title.png") 0 0 no-repeat;
    display: block;
    width: 107px;
    height: 27px;
    margin: 10px 0 -5px 0px; }
#top-panel td > a img {
      display: none; }
This is all you have to do. Btw, don't fall for the readme.txt inside userContent directory which says: "Files in this directory will be served under your http://server/jenkins/userContent/". Make sure you specify the URL according to your server configuration not according to this specification thus appending "/jenkins" in your URL.
Read more...
Bookmark this post:blogger tutorials
Social Bookmarking Blogger Widget |
Tuesday, 18 June 2013
Setting Installation Of Android Application To SD Card
Follow the steps below to enable installation of new softwares to the SD card on the android phones by default (Tested on android 2.2).
- Enable USB debugging on phone (from somewhere in Settings->About Phone)
- Connect device with PC using USB cable
- Open command prompt/terminal
- Open android debugger bridge (change directory to the location where android sdk is installed)
- Type: adb.exe devices
- Type: adb.exe shell
- On the new console, type: set pmInstallLocation 2
Here, 2 means External memory
Note: "get pmInstallLocation" can be used to query for the available locations you can install softwares to.
That's all. Hope it helps :)
Read more...
Bookmark this post:blogger tutorials
Social Bookmarking Blogger Widget |
Tuesday, 2 April 2013
Step By Step Turbo C++ IDE In Ubuntu 12.04
First thing first, download Turbo C from internet. For your ease, I've uploaded it HERE.
We will have to install dosbox to run the windows dos mode applications so lets install it:
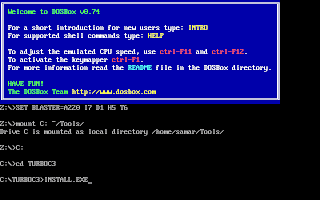
Once you install dosbox, unzip the content to somewhere in your $HOME directory. In my example, I unzipped the content of the Turbo C zip file into ~/Tools/TurboC3/. Now launch the dosbox by typing dosbox in the terminal. A dosbox emulation window will appear which will look like your old DOS system.
In the window, type the following (make sure you type appropriate path for your installation):
C:
cd TurboC3
INSTALL.EXE
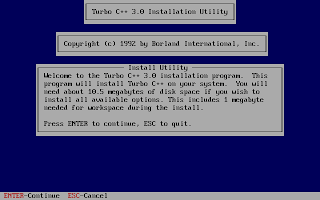
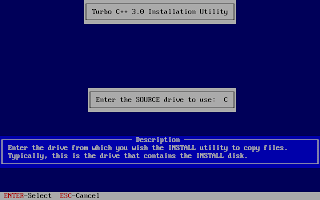
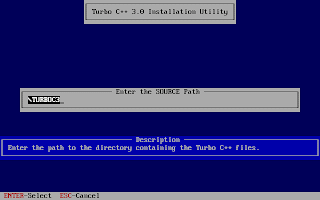
And, then follow the on-screen information. Refer to the screenshots below:
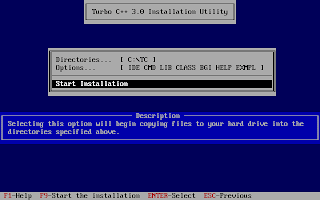
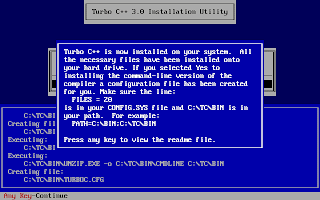
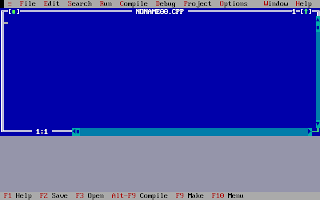
Once the installation finishes, you can then run the Turbo C by mounting the drive again and then navigation to C:\TC (cd C:\TC\BIN). If you need to use the Turbo C++ IDE frequently, my suggestion would be to add an autoexec entry in your dosbox configuration. The default configuration file resides in ~/.dosbox/dosbox-0.74.conf (My version of dosbox is 0.74 hence the file name, by default). Open up this file and in the section of [autoexec], add the lines below:
mount C: ~/Tools/
C:
cd TC\BIN
TC.EXE
Adding this entry will run the above commands during the startup of dosbox thus giving you the Turbo C IDE interface directly on running dosbox.
I hope this helps :)
Read more...
Bookmark this post:blogger tutorials
Social Bookmarking Blogger Widget |
Saturday, 9 March 2013
Check Battery Status From Terminal [How To]
present: yes
capacity state: ok
charging state: charged
present rate: unknown
remaining capacity: unknown
present voltage: 12276 mV
samar@Techgaun:~$ cat /proc/acpi/battery/BAT0/info
present: yes
design capacity: 4400 mAh
last full capacity: unknown
battery technology: rechargeable
design voltage: 10800 mV
design capacity warning: 250 mAh
design capacity low: 150 mAh
cycle count: 0
capacity granularity 1: 10 mAh
capacity granularity 2: 25 mAh
model number: Primary
serial number:
battery type: LION
OEM info: Hewlett-Packard
The first command provides the general status of the battery and the second command provides the detailed information about battery. The other way is to use the upower command that talks with the upowerd daemon. Upowerd daemon is a default daemon in ubuntu and few others for power statistics. Below is the command to see battery details:
native-path: /sys/devices/LNXSYSTM:00/LNXSYBUS:00/PNP0C0A:00/power_supply/BAT0
vendor: Hewlett-Packard
model: Primary
power supply: yes
updated: Sat Mar 9 10:12:17 2013 (5 seconds ago)
has history: yes
has statistics: yes
battery
present: yes
rechargeable: yes
state: empty
energy: 0 Wh
energy-empty: 0 Wh
energy-full: 47.52 Wh
energy-full-design: 47.52 Wh
energy-rate: 0 W
voltage: 12.28 V
percentage: 0%
capacity: 100%
technology: lithium-ion
If you wish to install acpi for future uses, you can do so by typing the command below:
Play around with different switches by looking over the help and man pages. You will find this tool quite useful :)
Read more...
Bookmark this post:blogger tutorials
Social Bookmarking Blogger Widget |
Wednesday, 30 January 2013
Search Text Over Multiple PDF Files In Linux
The pdfgrep tool lets you perform grep style search over multiple pdf files easily from the terminal. It depends upon the poppler package and under ubuntu, you can just type the command below to install pdfgrep.
Once pdfgrep is installed, you can perform any kind of search like you would do while using the grep command. Enjoy grepping the PDF files :)
Read more...
Bookmark this post:blogger tutorials
Social Bookmarking Blogger Widget |
Tuesday, 29 January 2013
How To Check Which Groups You Belong To
From the man page, the groups command does is:
Print group memberships for each USERNAME or, if no USERNAME is specified, for the current process (which may differ if the groups database has changed).
So if you are interested in finding what group a particular user is in, run the command as below. Replace samar with your USERNAME and you are good to go:
samar : samar adm cdrom sudo vboxusers ....
I hope this proves useful :)
Read more...
Bookmark this post:blogger tutorials
Social Bookmarking Blogger Widget |
Saturday, 26 January 2013
NCell PRBT Settings Information
Original Link: PRBT Information @ Ncell
Q1.What is PRBT?
PRBT service enables the ones who call you to listen to a popular melody or sound instead of the regular tone. The sound or melody is heard by the caller till the call is answered. Your friends and partners, regardless of operator, location and phone model while calling you can hear melodies, sounds and personal greetings chosen by you instead of usual phone tone.
Q2. How to activate PRBT service?
PRBT can be activated by one of the following ways:
I. SMS: On your Message box type A and send it to 900227
II. IVR: Dial 9208 and follow the instruction.
III. USSD: Dial *100*2# and follow the USSD guide instruction.
Q3. How to set a PRBT?
Any PRBT of your choice can be set via SMS, IVR or Web once the user has activated the PRBT service. Stated below are the ways a subscriber can set a PRBT.
I. SMS: Type BUY
II. Web :
i. Log on to prbt.ncell.com.np
ii. Click on Order for your choice of PRBT song
III. IVR: Dial 9208 to choose the tone of your choice.
Q4. What are the features with new PRBT system?
The PRBT system allows a subscriber to perform the following:
I. SMS
a. Download multiple PRBTs at once
Example:
Down
b. Gift PRBT to friend
Example: Gift
II. Web
To activate any of the features below, the user will have to login with mobile number and password on prbt.ncell.com.np
a. Assign different PRBT to different callers.
i. Click on MY PRBT > PRBT Settings > Advanced Setting
b. Create Group and allocate a PRBT for a group.
i. Click on MY PRBT > Group Management
c. Play different PRBT in different time slots.
i. Click On MY PRBT > PRBT setting > Add
d. Copy a PRBT from a friend.
i. Click on MY PRBT > Copy PRBT
Q5. How much does a PRBT cost and what is the validity?
Each PRBT will attract Rs. 10 excluding the taxes.
Q6. Is there monthly subscription price?
Yes. There will be Rs 10 monthly subscription price without applicable taxes. The subscription will be renewed automatically unless the subscriber chooses to discontinue the service.
Q7. How deactivate PRBT?
You can deactivate by any of the following ways:
I. SMS : In your message box type R and send it to 900227
II. IVR : Dial 900 follow instruction
III. USSD : Dial *100*2# and follow the instruction
Read more...
Bookmark this post:blogger tutorials
Social Bookmarking Blogger Widget |
Thursday, 10 January 2013
Create Backup Of List Of Apps Installed In Ubuntu
Now the list of packages will be saved in the installed_apps file and you can use it for future reference. I hope this is useful ;)
Read more...
Bookmark this post:blogger tutorials
Social Bookmarking Blogger Widget |
Wednesday, 28 November 2012
How To Export LibreOffice Impress Slides As Images
So the addon I was talking about is Export as Images extension which lets you export all the Impress slides or Draw pages into different image formats. The formats supported are JPG, PNG, GIF, BMP and TIFF format.
Once you install the extension, it adds a menu entry "Export as images..." to File menu and allows you to choose a file name for exported images, image size as well as some other parameters.
Installing Export as Images extension
First grab the extension from HERE or see if newer version is available from HERE.
Once you have downloaded the extension, the installation is pretty straightforward. Open up the Extension Manager from Tools menu and then click on Add. Now navigate to the folder containing your newly downloaded extension and select it. Once the installation succeeds, make sure to restart your LibreOffice Impress to make sure the extension gets activated.
Now open any presentation and to export all the slides as images, go to Files menu where you'll find a new entry Export as images... just below the Export... option.
The GUI for the extension is self explanatory. I hope this proves useful to you :)
Read more...
Bookmark this post:blogger tutorials
Social Bookmarking Blogger Widget |
Tuesday, 27 November 2012
Basic Guide To Crontab
Cron is a time-based job scheduling program which comes shipped with most linux distributions and enables users to execute commands or set of scripts automatically at the specified time. Cron is particularly important for system administration and maintenance though it can be used for any general purpose such as scheduling your porn downloads. My post is based on the Vixie Cron, a popular implementation of Cron by Paul Vixie which is by default the cron program in Ubuntu. Other implementations of the cron are anacron, fcron, and dcron.
The cron daemon runs automatically during the startup and consults the crontabs (shorthand for cron tables) for jobs to executed. Crontabs are nothing but files containing the commands to be run at the specified time, however there is a particular (& simple to remember) syntax for cronjobs to be run. You could directly edit these cron tables files but that's not the recommended way. You should always use the crontab editor to add/update jobs to the crontabs.
Cron searches its spool area (located at /var/spool/cron/crontabs) for crontab files which are named after the user accounts from /etc/passwd. As a matter of precaution, you should not directly manipulate the files in there. Additionally, cron reads the /etc/crontab file and all the files in /etc/cron.d. Also, there are other folders: /etc/cron.daily, /etc/cron.hourly, /etc/cron.monthly, and /etc/cron.weekly. And, the name of folders are obvious so if you put the scripts in one of these folders, your script will run either daily or hourly or monthly or weekly.
Since you got several files associated with cron, you have bunch of options on running the cron jobs in your system. First lets start with the crontab tool which is used to install, deinstall or list the tables used to drive the cron daemon. If the /etc/cron.allow file exists, then you must be listed (one user per line) therein in order to be allowed to use this command. If the /etc/cron.allow file does not exist but the /etc/cron.deny file does exist, then you must not be listed in the /etc/cron.deny file in order to use this command.
The crontab command provides following options:
        -e edit user's crontab
 -l list user's crontab
 -r delete user's crontab
 -i prompt before deleting user's crontab
crontab can be configured to use any of the editors.
To list the user's crontab, use the following command:
To delete existing cron table, type:
To install new cron table, type:
If you are wishing to add commands that require root privilege for execution, make sure you prepend sudo in the above command to add such commands to crontabs. The cron table expects each line of cron job in the following format:
i.e.
minute hour day_of_month month day_of_week command_to_run
These columns take the values in the range below:
  Minute (0 - 59)
  Hour (0 - 23)
  Day of month (1 - 31)
  Month (1 - 12)
  Day of the week (0 - 6, 0 representing sunday, 6 saturday)
Apart from these values, the cron entries accept other special characters. In each of these five columns:
- An asterisk (*) stands for "every".
- Slashes (/) are used to describe increments of ranges eg. */15 in minutes column would execute the specified command regularly and repeatedly after 15 minute.
- Commas (,) are used to separate items of a list. eg. using 1,2,3 in the 5th field (day of week) would mean Mondays, Tuesday, and Wednesday.
- Hyphens (-) are used to define ranges. For example, 2-5 in the 5th field would indicate Tuesday to Friday.
Now we know the format of how should each line of cron entry should look like, lets see some examples.
Run backup at 5 a.m every Monday
Run backup at 12:01 a.m monday-thursday
Run backup at 12:01 a.m on monday and thursday
Run backup every minute
Run backup every 15 minutes repeatedly
The information below is taken directly from man 5 crontab and can serve as a good reference for special strings in place of the 5 columns:
              @reboot        Run once, at startup.
              @yearly        Run once a year, "0 0 1 1 *".
              @annually      (same as @yearly)
              @monthly       Run once a month, "0 0 1 * *".
              @weekly        Run once a week, "0 0 * * 0".
              @daily         Run once a day, "0 0 * * *".
              @midnight      (same as @daily)
              @hourly        Run once an hour, "0 * * * *".
Now that you are feeling better with cronjobs, we will see how we can add cronjobs in the /etc/crontab file. The different thing about this crontab file is that there is an extra column for user field so that the particular cron entry is executed as the specified user.
The format for cron entry is similar to what we've seen already, with an extra column for user.
You can use any text editor such as nano or vi to edit the /etc/crontab file.
Finally, once you update crons, make sure to restart the cron daemon to ensure your new cron entries get read by the daemon.
I hope this primer for crontab helps you in your job scheduling job :D
Read more...
Bookmark this post:blogger tutorials
Social Bookmarking Blogger Widget |
Friday, 23 November 2012
Video Transcoding With HandBrake In Linux
Handbrake can save output in two containers, MP4 and MKV and I've been using it as a MKV transcoder for a while and I'm quite satisfied with it. Even though the official wiki says its not a ripper, I can see it to be quite useful DVD ripper.
Handbrake is available in CLI (HandBrakeCLI) and GUI (ghb) mode. Hence this offers the flexibility to choose the appropriate version according to your linux personality. As of now, we can install HandBrake from PPA and the latest version is v. 0.9.8 released back in July this year.
HandBrake can be installed from PPA. Issue the following commands in your terminal
$ sudo apt-get update
$ sudo apt-get install handbrake-cli
Or if you wish to install the GUI version, type:
I recommend using the CLI version since you can transcode/convert videos much more efficiently if you use the CLI version. But if you are not comfortable with the command line interfaces, the GUI version of HandBrake is also quite good.
Only problem I have felt is the naming convention of the commands for both the GUI and CLI versions of the tool. In order to run two versions of this tool, you need to type HandBrakeCLI for CLI version and ghb for the GUI version. The problem here is with the naming convention for the binaries. I mean, the names handbrake-cli and handbrake-gtk would be more straightforward than these badly chosen names. Otherwise, the tool does pretty good job of video conversion and can be good alternative if you are not comfortable with ffmpeg. Note that ffmpeg is also capable of video conversions of different formats and is a great tool. :)
Read more...
Bookmark this post:blogger tutorials
Social Bookmarking Blogger Widget |
Sunday, 11 November 2012
Wappalyzer - Browser Extension To Identify Web Servers
This very useful browser extension is available for Mozilla Firefox and Google Chrome. It is quite useful in server fingerprinting and identification steps. Wappalyzer tracks and detects several hundred applications under several categories.
Wappalyzer for Mozilla Firefox
Wappalyzer for Google Chrome
Wappalyzer @ GitHub
Once you install the addon and reload the browser, you will see the icons for identified applications on the right side of address bar (near to the bookmark & reload icon) in Mozilla Firefox. You can click in that area for more details.
One particular setting you would like to disable is the tracking and gathering of anonymous data which is *said* to be used for research purposes. You can turn off the tracking by going to the addon's preference page. Screenshot below shows the preference page in Mozilla Firefox.
Read more...
Bookmark this post:blogger tutorials
Social Bookmarking Blogger Widget |
Saturday, 3 November 2012
Bypass Slot Reservation In Counter Strike 1.6
format(g_cmdLoopback, 15, "amxres%c%c%c%c", random_num('A', 'Z'), random_num('A', 'Z'), random_num('A', 'Z'), random_num('A', 'Z'))
The bruteforce space is quite small, 4 uppercase characters from A-Z i.e. 26 * 26 * 26 * 26 combination is the maximum amount of search required to find the random part of the command. Hence, the command executed at client end is amxresXXXX where {X: X belongs to [A-Z]}. If there are still slots available for normal players or if the connecting user has slot reservation privilege, he will be able to connect to the server otherwise the server will kick the user. We are not going to bruteforce but we are going to use a memory viewer and editor software that is capable of reading the contents in the memory (RAM).
Basically, we hook into the Counter Strike client process from one of the freely available memory editors. We then connect to the server and get dropped due to the slot reservation message. In the meantime, the server sends the partial-random command.. FYI, these memory viewers make use of kernel APIs such as ReadProcessMemory() to read the memory layout of any process. We search for the initial part of the string which is amxres.
Once we find the unique string sent by server to our client, we use the alias command with amxresXXXX as our alias. For your info, alias provides a mechanism to group different commands to achieve something more useful.
The syntax of alias is: alias "alias_name" "cmd1; cmd2; ...; cmdn" And here we've just created an alias "amxresXXXX" which does nothing since the commands list is missing there.
The tool I've used here is ArtMoney available for download at http://www.artmoney.ru/e_download_se.htm In case, the site goes down, you can get it from here: http://www.4shared.com/file/wm7V4pgv/artmoney740eng.html
Several similar tools exist & are available for free. Some of them are CheatEngine (http://cheatengine.org/downloads.php) and Poke (http://codefromthe70s.org/poke.aspx)
Check the video below for more information:
Read more...
Bookmark this post:blogger tutorials
Social Bookmarking Blogger Widget |


