Showing posts with label linuxmint. Show all posts
Showing posts with label linuxmint. Show all posts
Monday, 16 September 2013
Two Ways To Print Lines From File Reversely
Ever tried to print lines in files in the reverse order? You will know two simple methods to print lines from file in the reverse order.
Imagine a file somefile.txt with content something like this:
You can achieve the same effect through other techniques as well but I'll stick to these simple ones :)
Read more...
Imagine a file somefile.txt with content something like this:
a
b
c
d
e
b
c
d
e
Method 1:
$ tac somefile.txt
e
d
c
b
a
e
d
c
b
a
Method 2:
$ sort -r somefile.txt
e
d
c
b
a
e
d
c
b
a
You can achieve the same effect through other techniques as well but I'll stick to these simple ones :)
Read more...
Bookmark this post: | 
|
Thursday, 27 June 2013
Manual Sun Java Installation In Linux
Be it be multiple installations of java or be it be custom server, you might run into the necessity of manually installing java. This tutorial will provide step by step commands for installing java manually in linux.
Though the process was done on CentOS, it should work for most linux systems with or without slightest modifications. The process below installs Sun Java and configures Sun Java to be the default java to be used. Below are the steps I took to install and configure java in my system:
If you wish to reconfigure the default java, you can run alternatives as below & choose the appropriate option:
I hope this helps :)
Read more...
Though the process was done on CentOS, it should work for most linux systems with or without slightest modifications. The process below installs Sun Java and configures Sun Java to be the default java to be used. Below are the steps I took to install and configure java in my system:
$ cd /opt/java
$ wget http://download.oracle.com/otn-pub/java/jdk/6u45-b15/jdk-6u45-linux-i586.tar.gz
$ tar xvfz jdk-6u45-linux-i586.tar.gz
$ echo 'export JAVA_HOME=/opt/java/jdk1.6.0_45' > /etc/profile.d/sun-jdk.sh
$ echo 'export PATH=$JAVA_HOME/bin:$PATH' >> /etc/profile.d/sun-jdk.sh
$ alternatives --install /usr/bin/java java /opt/java/jdk1.6.0_45/bin/java 2
$ java -version
java version "1.6.0_45"
Java(TM) SE Runtime Environment (build 1.6.0_45-b06)
Java HotSpot(TM) 64-Bit Server VM (build 20.45-b01, mixed mode)
If you wish to reconfigure the default java, you can run alternatives as below & choose the appropriate option:
$ alternatives --config java
Read more...
Bookmark this post: |
|
Friday, 21 June 2013
Share Local Directory With Remote Server During RDP Session
Well I have to constantly rdesktop to the remote servers at my workstation and sometimes I have to copy files and folders from my local machine. This post will provide you the steps on how to share files and folders with remote server during rdp session.
Normally, your RDP session would start with the following command:
But we wish to do something extra i.e. we need to share our directory with the remote server. The good news is that the rdesktop command supports device redirection using a -r flag which can be repeated.
Your command would look something like below:
You can then access your share as a drive or media. I hope this helps :)
Read more...
$ rdesktop -g90% your_server
But we wish to do something extra i.e. we need to share our directory with the remote server. The good news is that the rdesktop command supports device redirection using a -r flag which can be repeated.
Your command would look something like below:
$ rdesktop -g90% -r disk:share=/home/samar/scripts myserver
You can then access your share as a drive or media. I hope this helps :)
Read more...
Bookmark this post: |
|
Tuesday, 2 April 2013
Step By Step Turbo C++ IDE In Ubuntu 12.04
Well we are doing our labs based on the traditional Turbo C++ IDE and I decided to write this blog post with the information on how I installed it on my Ubuntu box.
First thing first, download Turbo C from internet. For your ease, I've uploaded it HERE.
We will have to install dosbox to run the windows dos mode applications so lets install it:
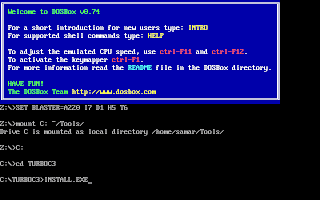
Once you install dosbox, unzip the content to somewhere in your $HOME directory. In my example, I unzipped the content of the Turbo C zip file into ~/Tools/TurboC3/. Now launch the dosbox by typing dosbox in the terminal. A dosbox emulation window will appear which will look like your old DOS system.
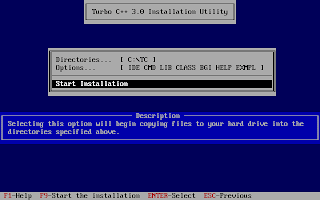
In the window, type the following (make sure you type appropriate path for your installation):
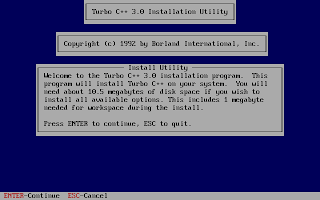
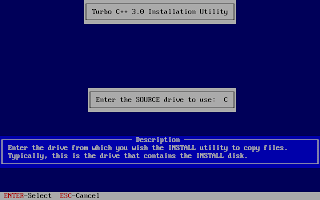
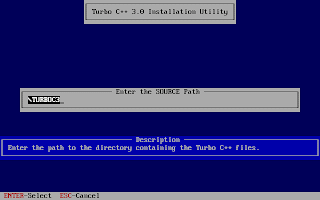
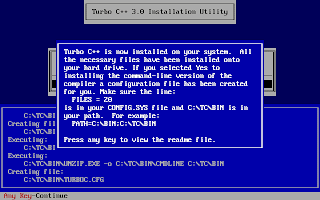
And, then follow the on-screen information. Refer to the screenshots below:
Once the installation finishes, you can then run the Turbo C by mounting the drive again and then navigation to C:\TC (cd C:\TC\BIN). If you need to use the Turbo C++ IDE frequently, my suggestion would be to add an autoexec entry in your dosbox configuration. The default configuration file resides in ~/.dosbox/dosbox-0.74.conf (My version of dosbox is 0.74 hence the file name, by default). Open up this file and in the section of [autoexec], add the lines below:
Adding this entry will run the above commands during the startup of dosbox thus giving you the Turbo C IDE interface directly on running dosbox.
I hope this helps :)
Read more...
First thing first, download Turbo C from internet. For your ease, I've uploaded it HERE.
We will have to install dosbox to run the windows dos mode applications so lets install it:
samar@samar-Techgaun:~$ sudo apt-get install dosbox
Once you install dosbox, unzip the content to somewhere in your $HOME directory. In my example, I unzipped the content of the Turbo C zip file into ~/Tools/TurboC3/. Now launch the dosbox by typing dosbox in the terminal. A dosbox emulation window will appear which will look like your old DOS system.
In the window, type the following (make sure you type appropriate path for your installation):
mount C: ~/Tools/
C:
cd TurboC3
INSTALL.EXE
C:
cd TurboC3
INSTALL.EXE
And, then follow the on-screen information. Refer to the screenshots below:


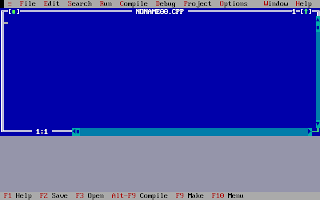
Once the installation finishes, you can then run the Turbo C by mounting the drive again and then navigation to C:\TC (cd C:\TC\BIN). If you need to use the Turbo C++ IDE frequently, my suggestion would be to add an autoexec entry in your dosbox configuration. The default configuration file resides in ~/.dosbox/dosbox-0.74.conf (My version of dosbox is 0.74 hence the file name, by default). Open up this file and in the section of [autoexec], add the lines below:
[autoexec]
mount C: ~/Tools/
C:
cd TC\BIN
TC.EXE
mount C: ~/Tools/
C:
cd TC\BIN
TC.EXE
Adding this entry will run the above commands during the startup of dosbox thus giving you the Turbo C IDE interface directly on running dosbox.
I hope this helps :)
Read more...
Bookmark this post: |
|
Tuesday, 29 January 2013
How To Check Which Groups You Belong To
In this post, you will get to know about a simple command that lets you know what groups the particular user belongs to. Users and groups are the one of the several concepts employed in the Linux systems for access control.
From the man page, the groups command does is:
Print group memberships for each USERNAME or, if no USERNAME is specified, for the current process (which may differ if the groups database has changed).
So if you are interested in finding what group a particular user is in, run the command as below. Replace samar with your USERNAME and you are good to go:
I hope this proves useful :)
Read more...
From the man page, the groups command does is:
Print group memberships for each USERNAME or, if no USERNAME is specified, for the current process (which may differ if the groups database has changed).
So if you are interested in finding what group a particular user is in, run the command as below. Replace samar with your USERNAME and you are good to go:
samar@Techgaun:~$ groups samar
samar : samar adm cdrom sudo vboxusers ....
samar : samar adm cdrom sudo vboxusers ....
I hope this proves useful :)
Read more...
Bookmark this post: |
|
Thursday, 10 January 2013
Create Backup Of List Of Apps Installed In Ubuntu
When my laptop's HDD was near to death, I had created backup of the list of all applications and packages I'd installed in my Ubuntu so that I would be able to install them easily in my new system in new HDD. I had forgotten about it but today suddenly remembered and am sharing this simple technique.
Fire up the terminal and type the following:
Now the list of packages will be saved in the installed_apps file and you can use it for future reference. I hope this is useful ;)
Read more...
samar@Techgaun:~$ sudo dpkg --get-selections > installed_apps
Now the list of packages will be saved in the installed_apps file and you can use it for future reference. I hope this is useful ;)
Read more...
Bookmark this post: |
|
Friday, 23 November 2012
Video Transcoding With HandBrake In Linux
HandBrake is a GPL-licensed, multiplatform, multithreaded video transcoder available for major platforms: linux, mac, and windows. HandBrake converts video from nearly any format to a handful of modern ones.

Handbrake can save output in two containers, MP4 and MKV and I've been using it as a MKV transcoder for a while and I'm quite satisfied with it. Even though the official wiki says its not a ripper, I can see it to be quite useful DVD ripper.
Handbrake is available in CLI (HandBrakeCLI) and GUI (ghb) mode. Hence this offers the flexibility to choose the appropriate version according to your linux personality. As of now, we can install HandBrake from PPA and the latest version is v. 0.9.8 released back in July this year.
HandBrake can be installed from PPA. Issue the following commands in your terminal
Or if you wish to install the GUI version, type:
I recommend using the CLI version since you can transcode/convert videos much more efficiently if you use the CLI version. But if you are not comfortable with the command line interfaces, the GUI version of HandBrake is also quite good.

Only problem I have felt is the naming convention of the commands for both the GUI and CLI versions of the tool. In order to run two versions of this tool, you need to type HandBrakeCLI for CLI version and ghb for the GUI version. The problem here is with the naming convention for the binaries. I mean, the names handbrake-cli and handbrake-gtk would be more straightforward than these badly chosen names. Otherwise, the tool does pretty good job of video conversion and can be good alternative if you are not comfortable with ffmpeg. Note that ffmpeg is also capable of video conversions of different formats and is a great tool. :)
Read more...
Handbrake can save output in two containers, MP4 and MKV and I've been using it as a MKV transcoder for a while and I'm quite satisfied with it. Even though the official wiki says its not a ripper, I can see it to be quite useful DVD ripper.
Handbrake is available in CLI (HandBrakeCLI) and GUI (ghb) mode. Hence this offers the flexibility to choose the appropriate version according to your linux personality. As of now, we can install HandBrake from PPA and the latest version is v. 0.9.8 released back in July this year.
HandBrake can be installed from PPA. Issue the following commands in your terminal
$ sudo add-apt-repository ppa:stebbins/handbrake-releases
$ sudo apt-get update
$ sudo apt-get install handbrake-cli
$ sudo apt-get update
$ sudo apt-get install handbrake-cli
Or if you wish to install the GUI version, type:
$ sudo apt-get install handbrake-gtk
I recommend using the CLI version since you can transcode/convert videos much more efficiently if you use the CLI version. But if you are not comfortable with the command line interfaces, the GUI version of HandBrake is also quite good.

Only problem I have felt is the naming convention of the commands for both the GUI and CLI versions of the tool. In order to run two versions of this tool, you need to type HandBrakeCLI for CLI version and ghb for the GUI version. The problem here is with the naming convention for the binaries. I mean, the names handbrake-cli and handbrake-gtk would be more straightforward than these badly chosen names. Otherwise, the tool does pretty good job of video conversion and can be good alternative if you are not comfortable with ffmpeg. Note that ffmpeg is also capable of video conversions of different formats and is a great tool. :)
Read more...
Bookmark this post: |
|
Tuesday, 13 November 2012
Linux Mint 14 "Nadia" RC Released
After 6 months of incremental development on top of stable and reliable technologies such as MATE, Cinnamon and MDM, Linux Mint 14 codenamed "Nadia" RC is available for download.

For the first time since Linux Mint 11, the development team was able to capitalize on upstream technology which works and fits its goals. After 6 months of incremental development, Linux Mint 14 features an impressive list of improvements, increased stability and a refined desktop experience. This new release comes with updated software and brings refinements and new features to make your desktop even more comfortable to use. Linux Mint 14 "Nadia" is based upon the Ubuntu 12.10 "Quantal Quetzal".
The download links (torrents and direct both) are available at this blog post.
Useful Links
Download Nadia
Nadia release notes
Whats New in Nadia
Read more...
Bookmark this post: |
|
Subscribe to:
Posts (Atom)